Table of Contents
What are Acrylic Nails?
Acrylics remain one of the most common artificial nail options today. They remain created using a combination of a liquid monomer and a powdered polymer. The mixture remains mixed to form a soft acrylic ball that can remain mounded into an artificial nail. Once the acrylic remains applied to the pin, it hardens into a solid false nail. It can then be polished and filed to your preferred shape and style.
Benefits of Acrylic
The most significant benefit of choosing an acrylic nail is durability – an acrylic set remains known to be highly sturdy and last longer on the nail.Acrylic Nails With Diamonds If properly cared for and removed, they can be a great (and inexpensive!) option for clients with brittle nails.
Acrylic Cons
Unfortunately, there are some downsides to choosing acrylic nails. While the finished product is lovely, it can also look unnatural if applied incorrectly or not diluted enough. Additionally, acrylic nails remain challenging to remove and often result in a damaged nail bed or peeling of the natural nails once the acrylic nails remain removed.
Due to acrylic nails’ reputation, many places may try to pass off their acrylic products as “UV Gel” or “Gel”. Just be careful! The combination of a liquid and a powder always remains acrylic.
With a shine that’s hard to ignore,
statement gems remain a walking advertisement for your salon and an easy upsell because they’re quick, easy. And you don’t have to be mainly artistic to achieve good results, says veteran nail artist Gina Silvestro. A client requesting this add-on does not shrink, so this dazzling look must shine through and stay on.
Every successful application of statement gems starts with the proper elaboration. Acrylic gems remain the least expensive and come in various colours and shapes. Still, they are not very durable, lack shine, and may not work well with gel or acrylic. Glass or synthetic lenses are often brighter and more durable, but they cost extra. For large gems, look for a slight curve at the bottom, says Van Nuys, California-based nail artist Yvette Garcia. “When they’re too big and flat, they tend to catch on to belongings too much.” For this reason, Silvestro indorses limiting the size of flatback stones to 8mm or less.
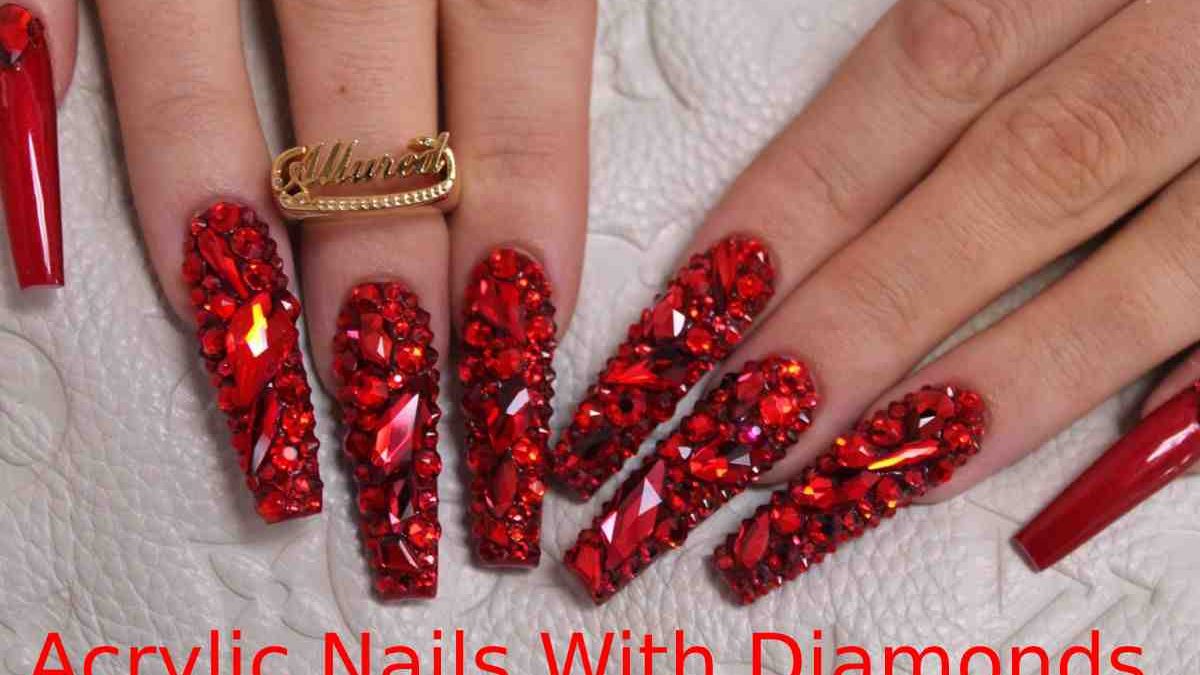
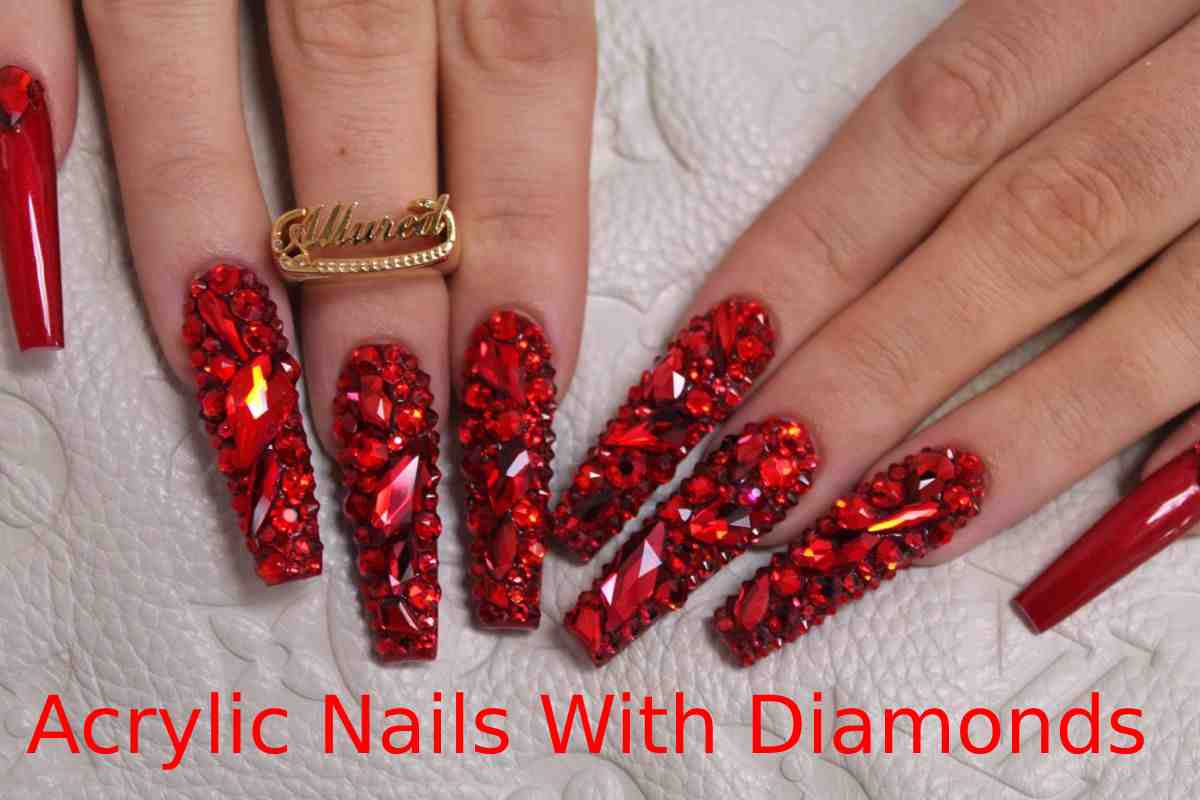
Acrylic Nails With Diamonds
Although most technicians have their favourite setting technique, the best approach may depend on the situation, including the type of gems used and the product currently on the nail. And the durability required. Gems get their shine from light reflecting off the facets, so anything on top of the stone will dull the shine regardless of the setting method. Here, the experts share tips and tricks for a maximum shine that won’t budge with nail polish, glue, and gel.
Application of Gems with Nail Polish
Attaching gems with nail polish is only recommended for short-term use, as nail polish does not have the same staying power as stronger adhesives. Still, it may be the right choice for a client who frequently returns for regular manicures or wants to try out some glitter before committing to something else. Before starting the service, ensure customers know that stones can fall off pretty quickly. After applying the top coat, let the nail dry a bit. Then press the gem into the top layer when the surface is wet enough to set it, but not so wet that the gem slides or stains, Garcia says. Once adhered, do not apply more top coat. Instead, use a small nail brush to carefully apply an additional top coat around the base of each gem, if needed.
Application of gems with glue or resin
Nail glue remains a strong adhesive that sets quickly but must be used with care as it can corrode the tops of some gems and damage the silver backing of stones over time. If you’re glueing rocks over regular nail polish, make sure the top coat is 100 per cent dry first, Garcia says. Suppose using glue over gel polish. Cure the nails, then lightly buff the design area with glitter before application for better adhesion, Silvestro advises. Choose a fast-setting bond and use what remains necessary. Always put glue on the nail (not the gem) and place the stone on the nail with a moistened cuticle stick or wax-tipped tool for maximum control. Additional bonds can remain seated at the base of each stone for added strength.
Application of gems with gel
This method remains strong enough to adhere to even the most enormous stones. And since the gel won’t damage Glass or synthetic crystal, the gems can be soaked, stored and reapplied for future appointments. No special surface preparation is needed, and apply the gel and crystals directly over the cured colour or set acrylic.
Gel gem application is a two-step process,
says Silvestro. First. Use a thick. Stiff gel to usual the gem in place and ask your client to turn their hand from side to side while it dries under the lamp. “This lets the light cure the gel between the crystals,” he explains. Next, carefully secure the Glass with a thin-medium viscosity gel to mask the edges.Acrylic Nails With Diamonds “Think of it as a ‘gel point,’ which will hold the gem in place the same way a point holds a diamond in a ring,” she says. “The gel needs to get to the stone’s belt to secure it.”
Don’t be afraid to experiment
Many technicians use a combination of gel and resin to apply gems. Garcia bonds larger stones with a thick, hard gel and then uses resin to fill in gaps after curing. Other technicians first adhere the gems with wax and then use gel to fill in the gaps. The critical point remains to make sure that the large stones are secure.